top of page
Practical Skills
Cloud animations- introduction to the theme weather
This is the first animation I made. I used different shapes and effects to make the clouds from scratch and then I added tone to make the clouds look even more realistic. I then used key frames and 3D effects to create movement.
WWW: I have created realistic looking clouds using colour and shape.
EBI: Add more clouds and space them out better to resemble the sky better.
This is the animation of a cloud with rain and lightning I made in After Effects. I used one of the original clouds I made in the first animation, and then used the particle and lightning effect to make the rain and lightning. Finally, I used key frames to give the cloud, rain and lightning a moving effect to make it more realistic.
WWW: I have created realistic movement with the rain and lightning.
EBI: Change the opacity of the rain and lightning closer to the clouds to make them look more blended in.
Cloud hat

Me and Lary used our design to create a cloud hat. We used a cardboard for the base of the hat because it is recyclable and hence better for the environment. Then we used wire for the top part of the hat and wrapped both parts of the hat with blue paper, which is also a recyclable material. Finally we stuck fluff to the hat in the shape of clouds and made a sun using yellow and orange paper.
WWW: We have made a hat which successfully shows the visual language elements colour and shape. Also I have made an item which links to my interest in fashion and design.
EBI: Make the exterior less messy by sticking the fluff down more neatly. Also to make the hat more functional by making the hat fit better around someone's head.
Cloud time lapse
Today we were taking photos and videos of clouds to link to the theme weather. We set up some cameras and recorded for around 13 minutes, and then used Premiere Pro and made the video into a time lapse by increasing the speed/duration to 2000%.
WWW: The video shows the movement of cloud effectively and I have also used an audio in the background to set the mood.
EBI: Adjust the video to make the clouds brighter.
Cloud photos
Photos using my phone


Photos using camera- zoom


These are the photos I took of the clouds. I took photos using my phone and closer up shots using a camera with a zoom lens.
WWW: I have taken photos of both brighter and overcast clouds, which portrays the different types of clouds and change in weather.
EBI: With the camera, focus the camera better so the photo is clearer.
Collages using positive and negative space


On the left page I made a hat and scarf design which links to weather. I then used the design of the hat to inspire the collage on the right.
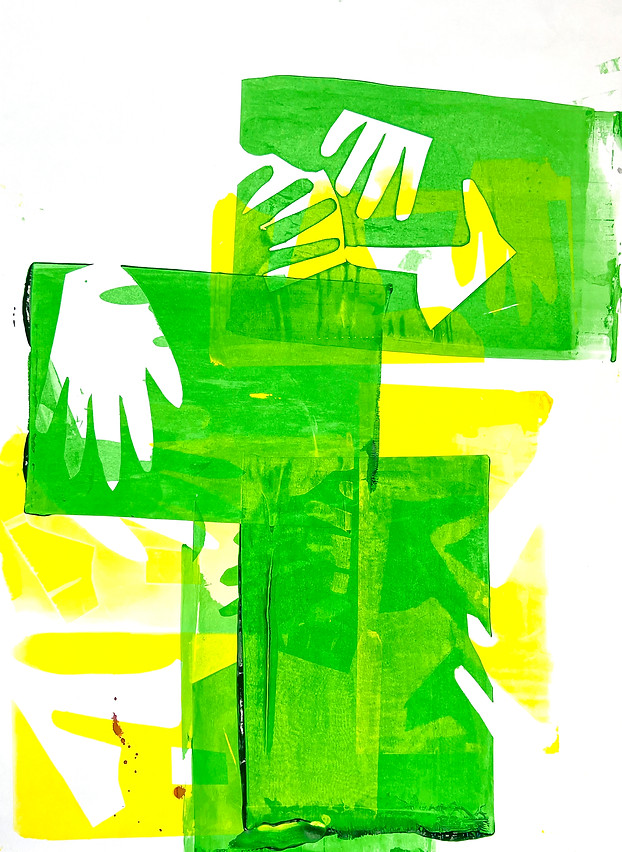
These are more collages I made. I used brightly coloured paper and created a hand design. These designs will help me develop my work in both fashion and graphic design, as a result of the bright colours and pattern.
This design links to weather because in the winter when hands get cold they turn different colours such as blue, hence I wanted to emphasise these colours with brightly coloured paper. I have considered the environment by using paper, which is a recyclable material, and I made sure that I kept any of the paper which I didn't use and could be used again.


To develop my collage designs, I photocopied them into different sizes, cut up the paper, and rearranged onto a bigger piece of paper to create a different and more abstract composition.
WWW: I have used a strong pattern in my work.
EBI: Experiment with other colours/textures such as fabric or painted paper.

Collage hats


I also used the collages to create hats out of paper. However i found this difficult because the paper wasn't very flexible to form a hat shape.
WWW: I have experimented to create 3D work.
EBI: Use different materials such as yarn to create the shape of the hat.
Transforming pattern into fashion designs


I used the hand pattern I made and edited it into different colours. I then used the original pattern and the edited patterns to create fashion designs, using the outfit styles I drew previously.
WWW: I have developed my original collage pattern into fashion designs- focusing on the theme cold weather.
EBI: Refine the designs so they look neater and the outlines are sharper.
Developing a fashion design using paint markers

I have taken one of the fashion designs I created digitally and turned it into a traditional drawing. I enlarged the design to A3 and used paint markers and thread for the design, and paint for the background. I wanted to experiment with different materials to create different textures. I also added a background of lightning and snow to present cold weather (storm), but also to complement the colours of the design.
WWW I have experimented with different materials to develop one of my designs further.
EBI: Add more layers to the paint markers so they look less streaky.
Coat design using paper


I've developed my designs further by making a paper coat on a small mannequin. I firstly used aluminium foil to create the shape, then I used paper mache over the foil, and finally i used prints of my design on paper to cover the newspaper.
WWW: I have used various materials to make a 3D experimental outcome.
EBI use stronger glue to stick the design on better.
Screenprinting
This is the screen print I made using my hand design. I made stencils of the collage and used them on the screen printing to block out the shapes. I used medium to make the ink slightly translucent and used a squeegee to spread the ink across the mesh and print on the paper. This piece didn't turn out how I wanted to as I feel the ink spread unevenly and I don't think the colours blended well together.
WWW: I have used a new technique to represent my pattern.
EBI: Spend more time making sure the ink is distributed well and isn't blotchy.
Collage

This is the second collage I created using different pieces of card. This collage focuses on moons as I believe the moon links to cold weather as a result of it signifying night which is the coldest part of the day. I also have used cooler colours to represent the cold weather too.
WWW: I have created an effective collage using the visual language elements- shape and colour.
EBI: Use a ruler/compass to make the lines more precise.
Transforming pattern into fashion designs


Like my previous collage, I used my moon collage to inspire my own fashion designs. I have created 2 more coat styles and used the collage design on the coat and the hat. I've also added ear muffs to fit with the cold weather theme. Once again I edited the collage to create different colours which I have used in the second design.
WWW: I have generated new fashion designs using my new design and different clothing shapes.
EBI: Try to design some outfits for men and other people to widen the range of outfits.
Lino Printmaking


I have used my moon collage to create lino prints. This is the first layer using the lightest colour so I can then overlap it with the darker colours. I cut out all the lightest areas on my lino then printed the light green on pieces of fabric and paper.
Health and Safety- I made sure I cut away from myself when using the lino cutters to reduce the risk of cutting my hand.
WWW: I have successfully created the start of my pattern using shape.
EBI: Use more ink/use a printing press to ensure the ink transfers fully onto the fabric and paper.


This is the second layer of lino printing I made. I cut out all the areas on the lino which I wanted to be light green, then I mixed blue and white ink to create a light shade of blue which I then printed over the first layer of ink on the paper and fabric. I found it hard at first to line up the lino hence some of the prints I made were misaligned. Also the fabric was especially difficult because the ink didn't transfer very well so you can see the green coming through the blue.
WWW: I have started to add extra layers and colours to add more detail to the lino prints.
EBI: Put the lino on top of the paper and fabric to line it up better.


This is the third layer of lino I printed. This time I cut out the light blue areas on the lino and mixed the inks to create a darker green.
WWW: The darker green adds more tone to the prints.
EBI: Make sure the roller is inked enough so the ink is better distributed over the prints.


This is the final layer of lino I printed. I cut all the areas which were dark green out of the lino and then mixed the inks to create a dark blue. I printed this on the paper and fabric.
Overall I think the prints are interesting as they have lots of texture and this effect could not have been replicated with other materials. However I found it hard to print on the fabric because the ink wasn't fabric ink, hence the layers being very light. Although I think some of the transparency of the ink is effective as you can see how the inks blend together and layer.
WWW: I have used the visual language elements shape, pattern and colour to make unique prints that can be transferred into both fashion and graphics.
EBI: I think I should've cut more of the lino out so the finish is cleaner and there is less unintended ink marks around the prints. Although I think some of these marks add texture. I think there is too many marks which makes the work look overwhelming and somewhat messy.


Creating collages out of unused lino prints


These are some of the collages I made using one of my lino prints which didn't go to plan. I used a craft knife to cut out negative shapes from the linos then created hand shapes out of card which I stuck over the linos. I decided to combine both my moon and hand designs to create interesting compositions. I have also mainly used cooler colours to present the cold.
Health and Safety- I made sure I cut away from myself and used a cutting mat when using a craft knife.
Environmental consideration- Instead of discarding the lino prints which didn't go to plan, I used them to create new collages to generate new ideas.
WWW: The collage has a strong use of colour and pattern.
EBI: I found that some of the shapes didn't cut very smoothly as the paper is thick and was difficult to cut with the craft knife.
Making mittens using my designs

To make the pattern, I used scrap pieces of donated fabrics and cut out the shapes similar to my collages. I then used the sewing machine to sew the shapes onto another piece of fabric using a zigzag stitch.
WWW: I have created different textures by layering different types of fabrics.
EBI: Refine the sewing by practising and going round the shapes neatly.


To start, I used some scrap material to create the shape of the mittens. I firstly made the outline too small hence it would not fit on my hand and the second design also didn't fit well as a result of the material not being stretchy. I was going to use this as lining for the mittens but I felt that it was too stiff and not a suitable material.


This is the first pair of mittens I made. I cut out a front and back outline from a sweatshirt which I upcycled, and then cut out the outline from the design I made. After that, I sewed the design on one of the sides and then sewed together the two sides inside out using the sewing machine, which I then turned the right way so that the stitching doesn't show.
Problems encountered- I found that it was hard to sew around the thumb without the material gathering together, which also happened when I used the less flexible material, as shown above. Therefore for the right hand mitten I had to sew this area from the outside which made the stitching a bit more messy. Although for the left hand mitten I sewed closer to the edge which makes the gathering less obvious.
Health and Safety- When using the sewing machine, I made sure I kept my fingers away from the needle at all times and also made sure that I turned the machine off when I was threading the thread through the needle.
Environmental consideration- for these gloves I used scrap fabric from older clothes and I also upcycled a sweatshirt to create them.
WWW: I have successfully made mittens and used a sewing machine to present the visual language elements pattern and shape.
EBI: When making the next pair of mittens, practise sewing around the thumb so the material doesn't gather.
Editing my patterns onto fashion photography


These are the photos I took in the photography studio which I then edited my pattern on in photoshop. The photos on the left are the original photos and the photos on the right are the ones I edited.
I used a white backdrop and yellow lights to create a light background to complement the pattern. I took mainly mid shots and a long shot at different angles to capture the clothing. The clothing in these photos are pale as it enabled me to edit the pattern onto the clothing easily.
To edit the pattern onto the clothing, I attached the pattern on top of the original photo and then selected the clothing I wanted the pattern on. I also used the mask tool to refine the selection so only the tops were selected. After doing so I used the liquify tool warp the pattern to create creases, and then I used various blending settings such as multiply and screen to make the pattern realistically blend into the clothes. Finally I adjusted the brightness to create a brighter background, and I also cropped the photos and used the Rule of Thirds to create a more interesting composition.
WWW: I have successfully blended my pattern to make the design look realistic and unedited.
EBI: If I had more time I would've liked to used more winter clothes to reflect the theme of my project. Also I think for some of the photos the lighting isn't right so when taking the photos I would adjust where the spotlights go and the settings of the camera.
Making another pair of mittens


This is the second pair of mittens I made. This time I used plain fabrics to emphasise the colours and shapes. Once again I used my designs to inspire the patterns I cut out, and then used a zig zag stitch using white thread to make the detail of the sewing stand out. This time I sewed an extra layer of sweatshirt to the back of each side so the mittens are thicker and warmer. I plan on hand sewing elastic onto the cuff so the cuff is more stretchy and easier to put around my wrist.
WWW: I have created more refined mittens by adding more detail to the sewing and adding extra layers to improve the practicality of the mittens.
EBI: Make sure to line up each side and cut all the sides to an equal length so they line up properly. also I used 2 different cuffs on the sweatshirt which I didn't realise were different lengths hence one side of the cuff is shorter than the other side.
Taking photos of my 3D work in the photography studio


These are the photos I took of the 2 pairs of mittens I made in the photography studio. I used a white backdrop and soft boxes to create bright and clean images. The soft boxes also made the photos of the mittens very good quality and hence the detail is shown clearly in the images. For most of the images I have brightened the background further so the detail is emphasised.
WWW: I have taken high quality photos of my 3D work.
EBI: Take photos at different angles to show more of the 3D elements of the mittens.
bottom of page